GMC Shipping + Refund Policy + Tax Explanation (with Template)
Regarding transportation policy, there's not much to say about transportation itself, but many people don't understand it, leading to frequent GMC failures. Today, Ceacer will explain it.

Delivery time:
Shipping time + Transportation time = Total transportation time
If my website's shipping time is 1-3 days and the transit time is 4-6 days, then the total transit time is 5-9 days.
That is, 1-3 days + 4 + 6 days = 5-9 days
You read that right, it's added together.
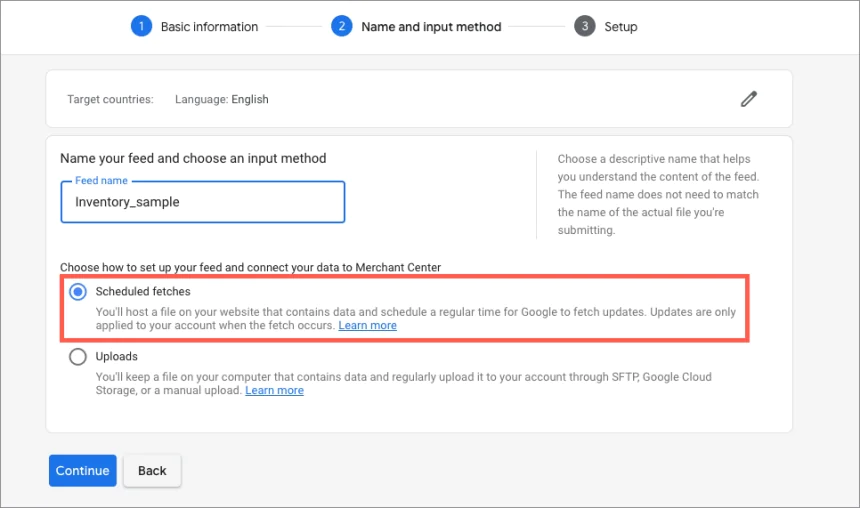
As shown in the picture:

Of course, you also need to fill in the corresponding information for your website and shipping policy.
Refund Policy
Refund policies are a rather troublesome issue because there are many situations requiring additional settings. Here, I'll discuss the simplest one.


Select the desired option and proceed to the next step. Then, select the product status and fill in the return date.

Click Next to continue.
Taxes and Fees
There are two types of taxation: " tax-free " and " tax-inclusive ".
No tax
Simply put, it excludes tax. This depends on the website's settings, which require the region to be tax-free; however, this varies by platform.
This direct setting excludes tax, as shown in the image:
If it excludes tax, you need to manually set the GMC tax information to 0; this is the simplest method.
Tax included
This means your product includes tax. In this case, you need to set up an automatic tax calculation plugin. SaaS platforms like Shopify, Shopline, and Shopyy generally offer plugins, but most are paid or have limited functionality. This is why I don't like using SaaS platforms for website building.
Automatic tax calculation requires minimal setup; simply add and save with one click.
WooCommerce offers a free automatic tax calculation plugin.


Share
What was your reaction?
 Like
0
Like
0
 Dislike
0
Dislike
0
 Love
0
Love
0
 Funny
0
Funny
0
 Angry
0
Angry
0
 Sad
0
Sad
0
 Wow
0
Wow
0


![[Targeted] Barclays Spend Bonuses – Get 5x Everywhere & Other Offers](https://ceacer.com/uploads/images/202511/img_w500_690af987ee7dd1-68789502.webp)

